Showing posts with label light. Show all posts
Showing posts with label light. Show all posts
Tuesday, November 18, 2014
Automatic LED Emergency Light

Description
This is the circuit diagram of a low cost emergency light based on white LED.The white LED provide very bright light which turns on when the mains supply is not there.The circuit has an automatic charger which stops charging when the battery is fully charged.
The IC LM 317 produces a regulated 7 V for the charging of Battery.Transistor BD 140 drives the out put.Transistor BC 548 and Zener diode controls the charging of the battery.
Tips
It is always better to connect a heat sink with BD 140.Before using the circuit out put of LM317 must be set to 7V by adjusting the potentiometer.
Sunday, November 16, 2014
Triac Light Switch circuit
The series of light switches this time slightly different from the stress of work. The series of light switches can work directly on the AC power network. Light switches are using the main component of TRIAC and LDR. The circuit is very simple and the components were sold in the market. If you want a light reception sensitivity of this circuit can be arranged then the 3.3 MOhm resistor can be replaced with a variable resistor. For more details can be seen from the following series of images.
Triac Light Switch circuit
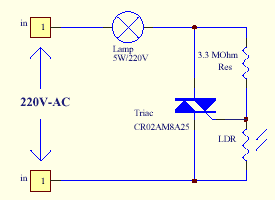
Triac Light Switch circuit series is priciple work as dimers, but dimers of control carried out by the reception of light around the LDR. The lower the intensity cayaha received LDR then semkin bright lights. For installation LDR need to be considered so as not exposed to light from the lamp directly.
Sunday, November 9, 2014
Build LED Light Pen Schematic
Physicians and repair engineers often use small light pens for visual examination purposes. Rugged and expensive as these pens may be, their weak point is the bulb, which is a ‘serviceable’ part. In practice, that nearly always equates to ‘expensive’ and / or ‘impossible to find’ when you need one.
LEDs have a much longer life than bulbs and the latest ultra bright white ones also offer higher energy-to-light conversion efficiency. On the down side, LEDs require a small electronic helper circuit called ‘constant-current source’ to get the most out of them.
LED Light Pen Circuit Diagram

Here, T1 and R1 switch on the LED. R2 acts as a current sensor with T2 shunting off (most of) T1’s base bias current when the voltage developed across R2 exceeds about 0.65 V. The constant current through the white LED is calculated from
R2 = 0.65 / ILED
With some skill the complete circuit can be built such that its size is equal to an AA battery. The four button cells take the place of the other AA battery that used to be inside the light pen.
Tuesday, November 4, 2014
Traffic Light Controller
Here the simple traffic light controller which is could be used to educate kids rudiments of traffic light guidelines. The circuit utilizes easily available electronic parts. It generally consists of rectifier diodes (1N4001), a 5V regulator 7805, two timers circuit using IC 555, two relays (5V, single-changeover), three 15W, 230V light bulbs and also several discrete parts.
Traffic Light Controller Circuit diagram :
Mains electrical power is stepped down by transformer X1 to provide a secondary output voltage of 9V, 300 mA – AC. Then the transformer output current is rectified by a full-wave bridge rectifier composed of diodes D1 through D4, filtered by capacitor C1 and also regulated by IC 7805 (IC1).
IC2 is wired as a multivibrator with ‘on’ and ‘off’ periods of about 30 seconds each with the part values determined. Once mains power switch is turned on, pin 3 of IC2 goes high for 30 seconds. This, in turn, energises relay RL1 via transistor T1 and the red bulb (B1) glows through its normally-open (N/O) contact. At the same time, mains power is turned off from the pole of relay RL2. As the ‘on’ time of IC2 ends, a triggers IC3 through C5. IC3 is set up as a monostable with ‘on’ time of about 4 seconds, which indicates pin 3 of IC3 will stay high for this period of time and energise relay RL2 through driver transistor T2. The amber bulb (B2) thus lightings up for 4 seconds.
Immediately after 4-second time period of timer IC3 at pin 3 lapses, relay RL2 de-energises and also the green bulb (B3) lights up for the rest of ‘off’ period of IC2, which is about 26 seconds. The green bulb is turned on through the normally closed (N/C) contacts of relay RL2. So when mains electrical switch is turned on, red light will light up for 30 seconds, amber for 4 seconds and green for 26 seconds.
You can easily build this circuit on a general purpose PCB and enclose in a protected box. The box needs to have sufficient area for installing transformer X1 and also two relays. It could be installed near 230V AC, 50Hz power supply or mounted on the PVC tube applied in assembly of the traffic light box.
Design of the traffic light container box is demonstrated in following image:
A stout cardboard box of 30x15x10cm3 is needed for housing the lights. To make certain durability, work with a 10x45cm2 plywood plate having 1.5 centimeters thickness and also secure onto it three light outlets and the box utilizing nuts and bolts or screws. Make three tubes of thin aluminium sheet, which is easily offered in equipment stores. The inner diameter of aluminium tubes ought to be such that these can well match on the light outlets. Working with a sharp knife, make holes opposite the outlets carefully. Wire the outlets at the back and take the cables out through the PVC tube.
To begin with, fix three 15W light bulbs (B1 through B3) and then press on the tubes. Support the other ends of the tubes in the holes made on the front panel of cardboard box. Sandwich gelatine papers of the three colors in between two sheets of cardboard and fix over the tubes. The visibility of red, amber and also green lights enhances with their installation on the tubular shape.
Saturday, November 1, 2014
120 Volt 4 LED Light Circuit
This circuit uses can exist used in the same way as a night light. It uses a 120 V Mains to power the circuit. plant like a charm!
 |
| Example |
 |
| Circuit Schematic |
Parts
4x - White LEDs
1x - 9.1K 5watt Resistor
1x - 1N4007
1x - 180or220uF 25v cap
1x - 1Meg 1/2watt Resistor
1x - 100mA fuse
1x - Enclosure
If the ac supply is 220 volts,then which resistir should replace and by which one, 220v is twice of 110v so doubles the value due to the voltage work, try to replace 9k1 with 22k-100k and capasitor voltage 160v.
Wednesday, October 15, 2014
LED light Organ Circuit Diagram
This is a fun circuit that can be at parties, for example. The four LEDs flash to the beat of the music. The light organ responds using a microphone to sound.T1 amplifies the signal from MIC. The sensitivity can be adjusted by P1. T4 controls the LEDs.
These are preferably LEDs with a high light intensity.MIC is a condenser microphone. The circuit can be powered by a 9 V battery.
LED light Organ Circuit Diagram

The 4 Budget
This circuit costs about € 6.15.
Parts List
- R1 = 10 k
- R2 = 330 K?
- R3, R6, R13 = 100 k
- R4, R8, R11, R14 = 47 Ω
- R5, R9, R12 = 1.5 MΩ
- R7, R10 = 47 k
- P1 = 220 K?
- C1, C2, C3 = 100 nF
- C4 = 100 uF
- D1-D4 = LED
- T1, T2, T3 = BC547B
- T4 = BC557B
- MIC = microphone capsule
Thursday, October 9, 2014
latest Light Detector by IC CD4001 circuit and explanation
Variable resistor R1 adjusts the light threshold at which the circuit triggers. R1’s value is chosen to match the photocells resistance at darkness. The circuit uses a CMOS 4001 IC. Gate U1a acts as the trigger, U1b and c form a latch. S1 resets the circuit. The output device may be a low power piezo buzzer.

Kindly submitted by Mick Devine from the UK
Wednesday, June 12, 2013
Philips LED Queen Star light bulbs in Taiwan officially listed
Recently, the worlds first won the U.S. Energy Star Queen Star of Philips LED bulb is officially on sale in Taiwan. This section bulb uses 300-degree ultra-wide-angle lighting, 825 lumens, 2700K color temperature, 80% of CRI, 12W power consumption, the highest life expectancy of 25,000 hours (six hours a day, you can use 11.4 years).
Bo Jiansheng of the general manager of Philips Taiwan said that the development of green technology is the most important global issues, green sustainable development is an important core value of the Philips, Philips attaches great importance to lighting technology to enhance the quality of human life, improve energy efficiency, and practice green ecological concept, to bring comfort and quality of life of the public health.
Recently, the worlds first won the U.S. Energy Star Queen Star of Philips LED bulb is officially on sale in Taiwan. This section bulb uses 300-degree ultra-wide-angle lighting, 825 lumens, 2700K color temperature, 80% of CRI, 12W power consumption, the highest life expectancy of 25,000 hours (six hours a day, you can use 11.4 years).
Philips accounted for nearly 40 percent of the global LED light bulb market, Philips LED Queen Star has more than one million sales in the world, has made the international IEC eye certification, the German iF design awards, Time magazine boutique Medal U.S. Department of Energy L-Prize, energy-efficient lighting awards international awards.
Monday, May 13, 2013
Bicycle back Safety Light
 This circuit has been designed to provide a clearly visible light, formed by 13 high efficiency flashing LEDs arranged in a pseudo-rotating order. Due to low voltage, low drain battery operation and small size, the device is suitable for mounting on bicycles as a back light, or to put on by jogger/walkers.
Sunday, May 5, 2013
New Photo Meter Assesses Ambient Light Schematic
Most PN-junction diodes can be used as photodiodes. While not optimized for this application, they do work. When the diode is reverse biased, it will produce a small photovoltaic output as the light level is increased. LEDs are particularly suited for this task because their housings are transparent.
You can construct a simple circuit that will assess the condition of ambient lighting and, because many LEDs’ packages are tinted to enhance their emitted color, may even yield a reasonable evaluation of the detected color. The results are not as effective as those obtained using a high-quality optical filter, which typically has narrow bandpass characteristics, but they can be quite acceptable. Though the design described here does not produce the accuracy of designs with laboratory-grade photodetectors and transimpedance amplifiers, it can be quickly assembled and will produce usable results at a low cost.
Three LEDs are used; experimentation will indicate which device has the best sensitivity to which color (Figure 1). The ambient light falling on the LEDs causes some current flow—typically in the range of 10 to 100 nA—through each LED, depending on the applied illumination level. This current flows through the base of a transistor, Q1, and is amplified. Q1’s collector current then splits between potentiometer R4, which acts as a first-stage gain calibration, and the base of Q2.
Photo Meter Assesses Ambient Light Schematic

Q2 provides further amplification and drives the left side of a bridge circuit (D1A and D1B). Note that R2/D1 and R3/D2 form a balanced bridge. Q2’s collector current provides a slight imbalance to the bridge. The meter, M, measures this imbalance. R5 adjusts the sensitivity of the meter. Set R4 and R5 such that the meter has an appropriate deflection. R4 is useful for selecting the quiescent point; R5 is useful for adjusting the sensitivity.
Before building the circuit, check whether the LEDs can be used as photo sensors. To determine whether a given LED is a good photodiode, check the voltage across the LED using a common digital multimeter set to its most sensitive range—typically 200 mV. Typical output voltage should be approximately 0.3 to 1 mV with typical office illumination.
Before building the circuit, check whether the LEDs can be used as photo sensors. To determine whether a given LED is a good photodiode, check the voltage across the LED using a common digital multimeter set to its most sensitive range—typically 200 mV. Typical output voltage should be approximately 0.3 to 1 mV with typical office illumination.
Subscribe to:
Posts (Atom)